By the end of this Google Tag Manager setup you will have a container installed on your site, GA4 running through it, and four conversions tracked: WhatsApp clicks, phone taps, email clicks and form submissions. It takes one to two hours the first time. You will not need to write code, although one optional section shows a small snippet for developers.
You need admin access to the website, a Google account and a GA4 property.
If you do not have a GA4 property yet, create one first with our GA4 setup guide and come back.
What Tag Manager is, and what it is not
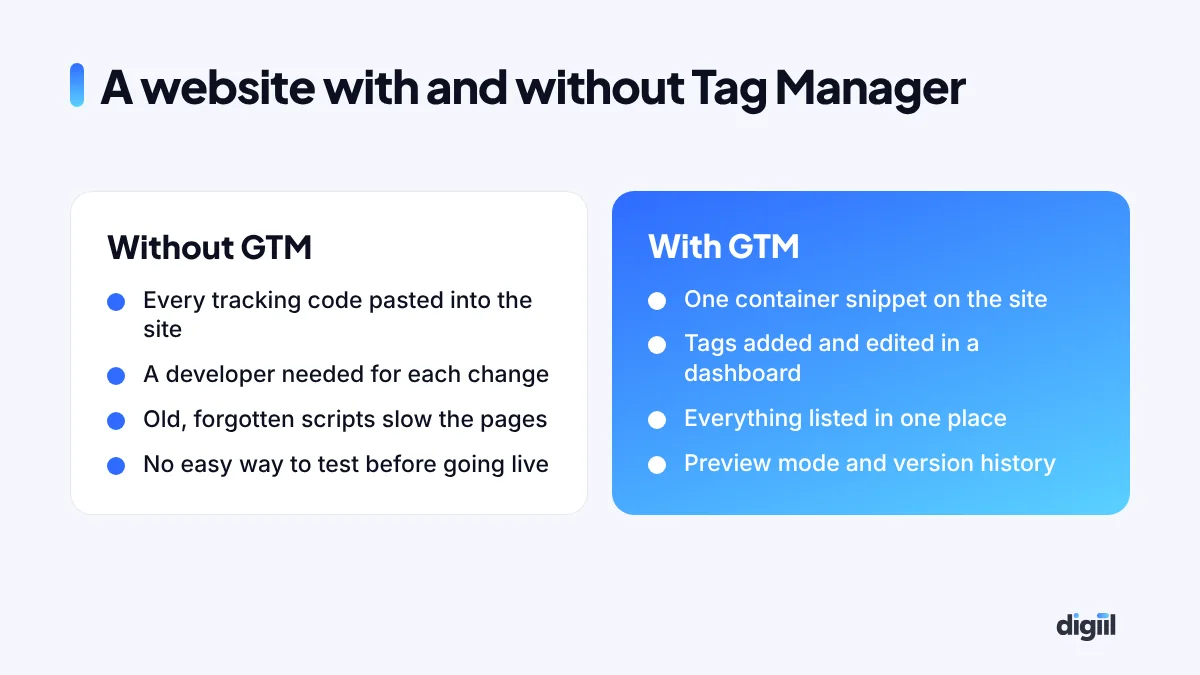
Google Tag Manager (GTM) is a container that sits on your website. Inside it you add “tags”: small pieces of tracking from Google Analytics, Google Ads, Meta, TikTok, LinkedIn and others. You decide when each one runs. After the container is installed once, you manage everything from the GTM dashboard instead of editing the site.
It is not an analytics tool. It has no reports. Think of it as the switchboard, and GA4 or Ads Manager as the place the calls end up.
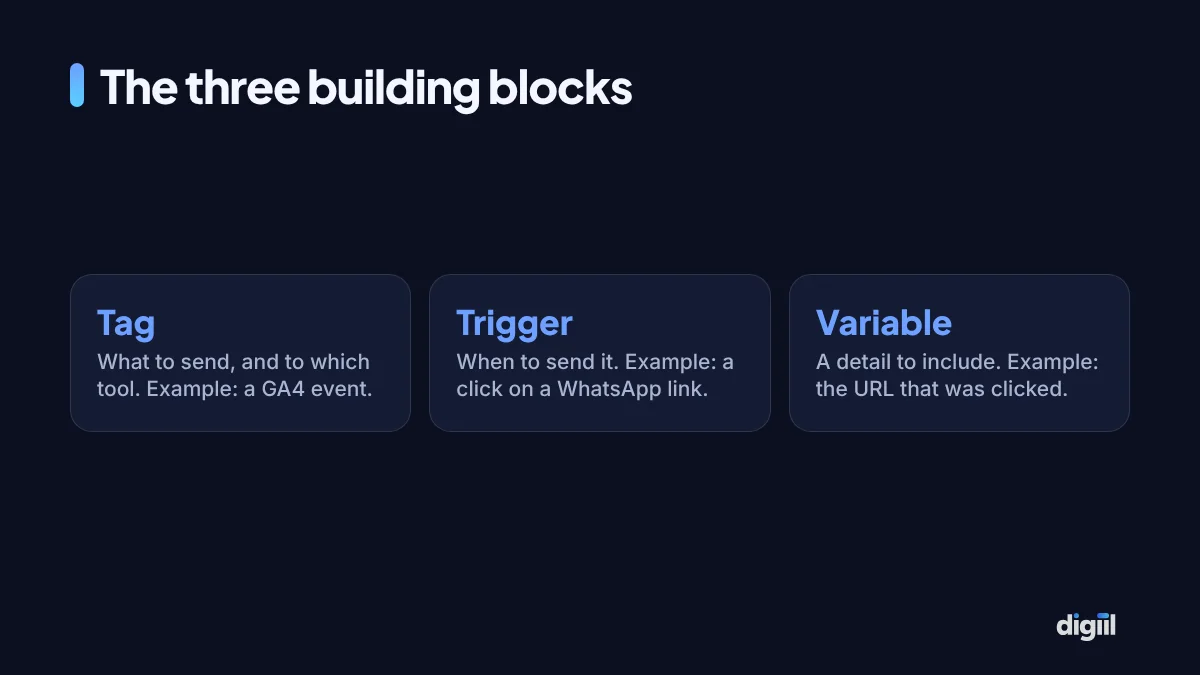
Every setup in GTM is some combination of these three. “Send a GA4 event (tag) when someone clicks a link (trigger) whose address contains wa.me (variable condition).” Once that sentence makes sense, the rest of this tutorial is repetition.
Part 1: Create the account and container
- Go to tagmanager.google.com and sign in with the Google account that should own the tracking. Use a company-controlled account, not a freelancer’s personal one.
- Create an account. Name it after the business. Choose your country.
- Create a container. Name it after the website, for example “yourshop.com”. Choose “Web” as the target platform.
- Accept the terms. GTM then shows two code snippets and your container ID, which looks like GTM-XXXXXXX. Keep this window open.
One account can hold several containers. One container per website is the normal arrangement.
Part 2: Install the container on your site
WordPress
The simplest route is a plugin. Two reliable options:
- GTM4WP. Install, open its settings, paste the container ID and save. It also has optional settings that push WooCommerce product and purchase details into the data layer, which you will want later if you run a store.
- Site Kit by Google. Connect your Google account and enable the Tag Manager module.
Use one method only. If your theme has its own “header scripts” box, do not paste the snippet there as well.
Shopify, Wix and other builders
Each platform has its own place for the container. Check the platform’s current help page, because where the code goes and what it can track at checkout differs between plans.
A custom-coded site
Ask the developer to paste the first snippet as high in the <head> as possible and the second immediately after the opening <body> tag, on every page template.
Check that it works
In GTM, click Preview, enter your website address and connect. A new tab opens your site with a “Tag Assistant Connected” badge. If the debug window lists “Container Loaded”, the install is good.
If GA4 was already added to the site by a plugin, a theme option or pasted code, and you now add it through GTM too, every visit is counted twice. Decide that GTM will be the only source and remove the older code after your GTM version is published.
Part 3: Add GA4 through GTM
- Find your Measurement ID. In GA4, go to Admin, Data streams, select your web stream. The ID starts with G-.
- Create a new tag in GTM. Tags, New. Choose the tag type “Google Tag”.
- Paste the Measurement ID in the Tag ID field.
- Choose the trigger “Initialization – All Pages”. This makes the Google tag load before your other tags.
- Name it “GA4 – Config” and save.
Click Preview again and load a page. In the debug window you should see your tag under “Tags Fired”. In GA4, open Admin, DebugView. Your visit appears there within seconds, with a page_view event.
GA4’s enhanced measurement already records scrolls, outbound clicks, site search and file downloads without extra work. What it does not know is which actions matter to your business. That is the next part.
Part 4: Track the clicks that mean business
Turn on the click variables
Go to Variables, then Configure under Built-In Variables. Tick Click URL, Click Text, Click ID and Click Classes. Also tick Page Path and Page URL if they are not already on. Without this step, click conditions have nothing to check against. It is the most commonly missed step in any GTM tutorial.
WhatsApp clicks
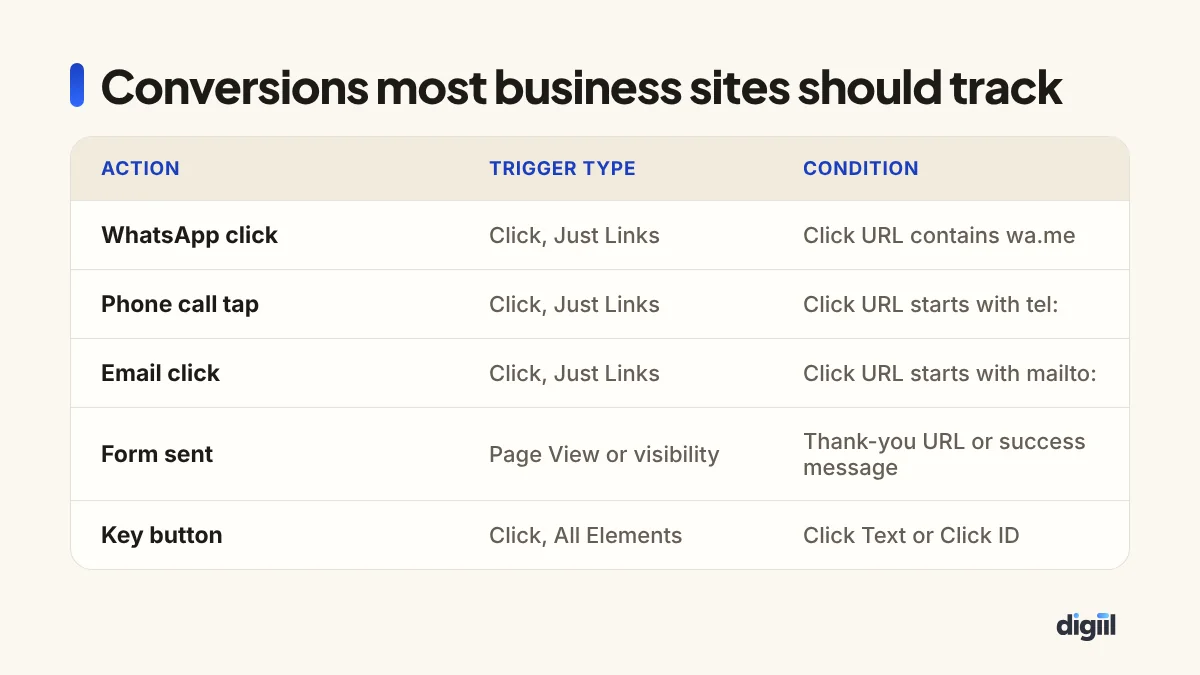
- Create the trigger. Triggers, New. Type: “Click – Just Links”. Choose “Some Link Clicks”. Condition: Click URL, contains,
wa.me. If your site uses the longer format, add a second trigger or use “matches RegEx” withwa\.me|api\.whatsapp\.com. Name it “Click – WhatsApp links”. - Create the tag. Tags, New. Type: “Google Analytics: GA4 Event”. Enter your Measurement ID. Event name:
whatsapp_click. - Add a parameter (optional but useful): name
page_path, value{{Page Path}}, so you can see which page produced the click. - Attach the trigger and save as “GA4 – Event – whatsapp_click”.
Phone taps and email clicks
Repeat the same pattern. For calls, the condition is Click URL starts with tel: and the event name phone_click. For email, Click URL starts with mailto: and the event name email_click.
These only work if the number on your site is a real link. Plain text that looks like a phone number cannot be tracked this way. Ask whoever maintains the site to make it <a href="tel:+8801XXXXXXXXX">.
A specific button
For a “Book a call” or “Add to cart” button that is not a simple link, use the trigger type “Click – All Elements” with a condition on Click Text (equals “Book a Free Call”) or, more reliably, Click ID or Click Classes. In Preview mode, click the button and look at the Variables tab for that click to see exactly what values GTM received. Then build the condition from what you see, not from what you assume.
Use lowercase with underscores, and keep names short and descriptive: whatsapp_click, phone_click, generate_lead. GA4 has a list of recommended event names. Where one fits, such as generate_lead for a form or purchase for an order, use it, because GA4 and Google Ads understand those automatically.
Part 5: Track form submissions
Forms are the awkward part, because websites build them in different ways. Try these methods in order and stop at the first one that works.
Method A: the thank-you page
If the form sends people to a separate page such as /thank-you/, you are in luck. Create a trigger of type “Page View”, “Some Page Views”, with Page Path contains /thank-you. Attach a GA4 Event tag named generate_lead. This is the most reliable method. If you can ask your developer for one thing, ask for a thank-you page.
Method B: the success message
Many forms stay on the same page and show “Thanks, we will contact you”. Use the trigger type “Element Visibility”. Select by CSS selector, enter the selector of the success message, and tick “Observe DOM changes”. The trigger fires when the message appears.
Method C: the built-in form trigger
GTM has a “Form Submission” trigger. It works with traditional forms and fails silently with many modern ones that submit in the background. Test it in Preview. If nothing shows when you submit, move on.
Method D: a data layer event
The cleanest approach on custom sites. The developer adds one line that runs when the form succeeds:
window.dataLayer = window.dataLayer || [];
window.dataLayer.push({ event: 'form_success', form_name: 'contact' });
In GTM, create a trigger of type “Custom Event” with the event name form_success. Several WordPress form plugins and GTM4WP can produce events like this for you.
It is a list that your website and GTM both read and write. The site puts facts into it, such as “an order worth Tk 2,450 was placed”, and GTM picks them up and passes them to GA4 or Meta. It is the proper way to send details like order value, product names and form names.
Mark the conversions in GA4
Once the events have appeared in GA4 (allow up to a day for them to show in Admin, Events), mark the important ones as key events. Do this for generate_lead and, if chats and calls are how you sell, for whatsapp_click and phone_click. Key events are what you can import into Google Ads as conversions.
Part 6: Test, then publish
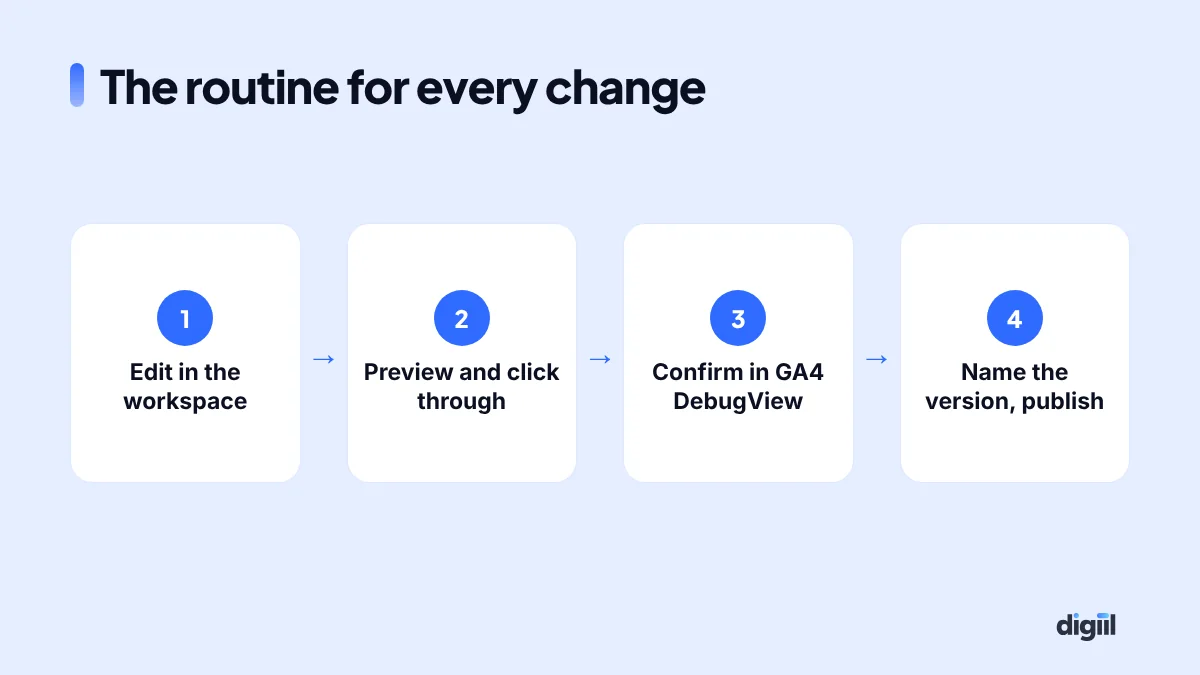
Nothing you have built is live yet. GTM keeps changes in a workspace until you publish.
Test. Click Preview. On your site, perform each action once: tap WhatsApp, tap the phone number, submit a test form. In the debug window, click each event in the left column and confirm that the correct tag shows under “Tags Fired”, once. If a tag is under “Tags Not Fired”, click it. GTM shows each trigger condition with a tick or a cross, which tells you exactly what did not match.
Publish. Click Submit. Give the version a name that says what changed, such as “GA4 base plus WhatsApp, call and form events”. Then publish.
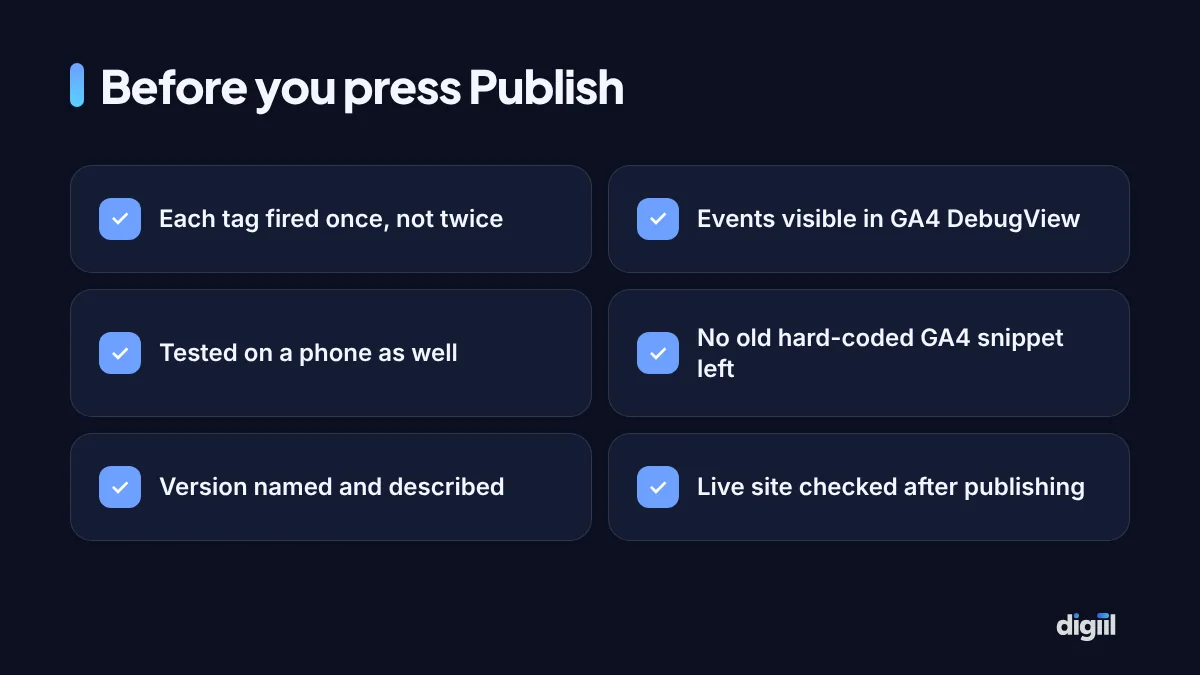
Every published version is saved. If something goes wrong, open Versions, pick the previous one and choose Publish again. That safety net is one of the best reasons to use GTM.
What to add next
Google Ads conversions
The simplest path is to import GA4 key events into Google Ads. For more precise attribution, add a “Google Ads Conversion Tracking” tag in GTM with the conversion ID and label from your Ads account, and add one “Conversion Linker” tag that fires on all pages.
Meta Pixel
Add the base pixel with a Custom HTML tag or a template from the Community Template Gallery, firing on all pages. Then add event tags for Lead, Contact or Purchase on the same triggers you built above. Stores on WooCommerce should also read our Meta Pixel for WooCommerce guide, since a plugin can be the simpler choice there.
E-commerce events
View item, add to cart, begin checkout and purchase need product and order details from the data layer. On WooCommerce, GTM4WP can supply them. This is the point where many owners bring in help, because a wrong order value quietly ruins every report after it.
Consent
If you have visitors from the EU or UK, tags may need to wait for cookie consent. GTM supports Google’s consent mode, usually through a consent banner tool’s template. A Bangladesh-only audience has fewer legal requirements today, but ad platforms increasingly expect consent signals for European traffic.
Server-side tagging
Browsers and ad blockers stop a share of browser-based tracking. Server-side tagging sends data through your own server to reduce that loss. It is an advanced step with hosting costs, covered in server-side tracking explained.
Keeping the container tidy
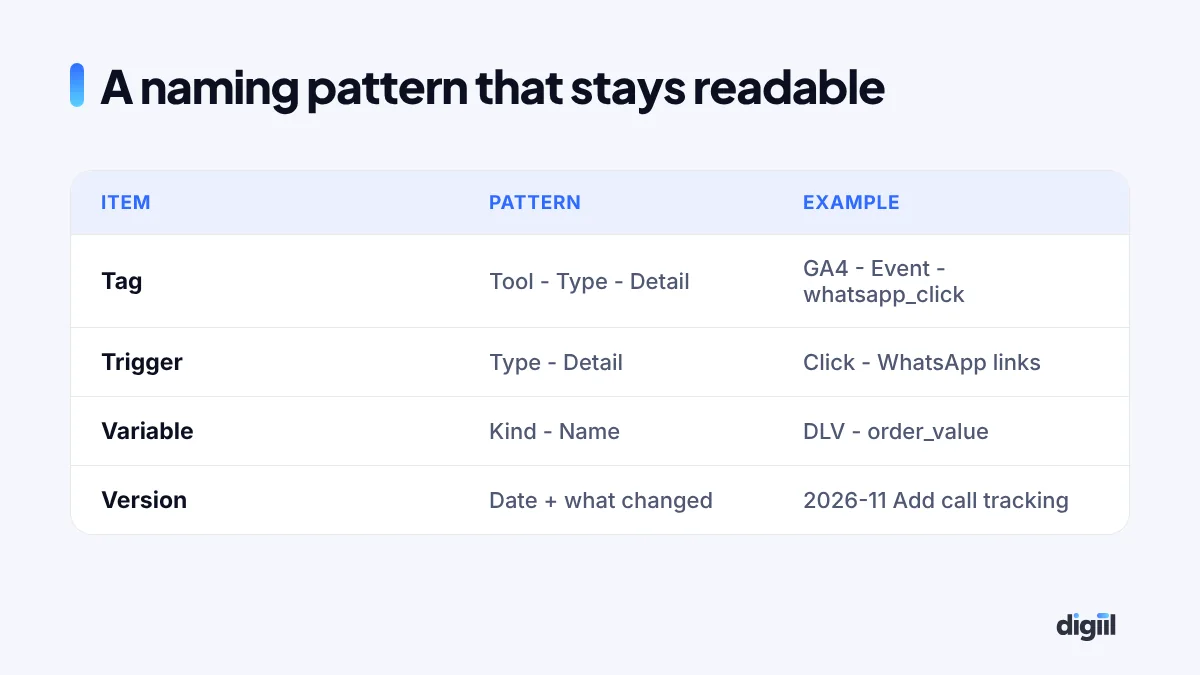
- Name things consistently. In six months you, or someone else, will need to find a tag in seconds.
- Use folders for each platform: GA4, Google Ads, Meta.
- Store the Measurement ID in a Constant variable so you type it once.
- Pause, then delete. When a campaign or tool ends, pause its tags. Delete them after a month if nothing broke.
- Control access. In Admin, User Management, give “Publish” rights to very few people. Others can have “Edit” and ask for approval.
- Review twice a year. Remove tags for tools you no longer pay for.
Troubleshooting
| Symptom | Likely cause | Fix |
|---|---|---|
| Preview will not connect | Ad blocker, or container not on that page | Disable extensions, check the page source for your GTM ID |
| Tag fires twice | Two triggers match, or the container is installed twice | Search the page source for “GTM-” and remove the duplicate |
| Page views doubled in GA4 | GA4 also hard-coded or added by a plugin | Remove the older GA4 code |
| Click trigger never fires | Click variables not enabled, or the element is not a link | Enable built-in variables, switch to All Elements |
| Works in Preview, not live | Changes were never published | Submit and publish the workspace |
| Event in DebugView, not in reports | Standard reports take time to process | Wait 24 to 48 hours |
| Form event fires on every page view | Trigger set to All Pages by mistake | Limit it to the thank-you path |
If numbers in GA4, Meta and your order sheet still disagree after all this, work through how to fix ad tracking.
What you have now
A single container that you control, GA4 loading through it, and the four actions that most service and lead-generation websites depend on being counted. From here, every new platform is a tag and a trigger, not a developer ticket.
If you would prefer this set up and checked by specialists, including e-commerce events and server-side tagging, see our Google Tag Manager service or book a free 15-minute strategy call.
Frequently asked questions
Is Google Tag Manager free?
Yes. The standard version is free and is enough for almost every business website. A paid enterprise version, Tag Manager 360, exists for very large organisations.
Do I still need GA4 if I use Google Tag Manager?
Yes. Tag Manager does not store or report data. It only delivers information to tools such as GA4, Google Ads and Meta. You read the results in those tools.
Does Google Tag Manager slow down a website?
The container itself is light and loads asynchronously. What slows a site is the number and weight of tags inside it. A tidy container is usually faster than the same scripts pasted directly into the site.
Can I install GTM on WordPress without a developer?
Yes. A plugin such as Site Kit by Google or GTM4WP adds the container when you enter your container ID. On custom sites, a developer pastes two short snippets into the template once.
Why does my tag not fire?
The usual reasons are a trigger condition that does not match, a built-in variable that was never enabled, the container not being published, or a browser extension blocking it. Preview mode shows which condition failed.

Amanat has 7+ years in digital marketing and has managed $8M+ in Google and Meta ad spend for 235+ brands in the UK, USA, Australia and Bangladesh. He holds 20+ certifications, including Digital Marketing Strategy from Harvard Business School Online. More about Amanat